
Laptop Installation Procedure HOS v1.1 RC3
This procedure details how to install Helion OpenStack v1.1 RC3 (build 77) on to a laptop for ‘tyre-kicking’ use only.
HA and monitoring are not enabled, by design, during this install procedure to minimise resource requirements.
An EliteBook8740w with 32GB RAM and a 240GB SSD was used to verify this procedure.
Step-by-step guide
- All the standard pre-requisites are still applicable and need to be applied to the base Ubuntu 14.04.01 LTS which can be found here.
Prerequisites
ssh-keygen -t rsa -N ""sudo apt-get install -y ntp xrdp xfce4 libvirt-bin openvswitch-switch openvswitch-common python-libvirt qemu-kvm libssl-dev libffi-dev virt-manager chromium-browsersudo /etc/init.d/libvirt-bin restart |
- Configure a local NTP server by editing the /etc/ntp.conf file and replacing the default ubuntu ntp servers and ntp pools with the following :
Modify /etc/ntp.conf
# Specify one or more NTP servers.server 127.127.1.0fudge 127.127.1.0 stratum 10restrict 192.0.2.0 mask 255.255.255.0 nomodify notrap |
- Restart the NTP service and verify it’s running locally
Restart & Verify NTP
service ntp restartntpq -p |

- Extract the latest Helion OpenStack build
Extract the installation binaries
# Note : in this demo the binaries are located in the /home/helion directory. Please ensure the correct location is modified for the HOS binaries (tar file)cd /roottar -zxvf /home/helion/ee_installer_build77.tgz |
- Setup the environment variables required by the installation script
Seed Host Environment Variables
# configure environment variablesexport NODE_MEM=4096export NODE_CPU=4export HP_VM_MODE=yexport SEED_NTP_SERVER=<laptop ip address>export SEED_NAMESERVER=<dns server> |
- Create a new vmplan file – this is the new process that allows roles to be assigned to servers. This is the file that can be adapted to fit the underlying hardware…within reason!
32GB Laptop VMPLAN File
cat << EOF > vmplan.csv,,,,2,8192,,Undercloud,,,,2,7168,,OvercloudControl,,,,2,7168,,OvercloudControl,,,,2,7168,,OvercloudControl,,,,2,3072,,OvercloudSwiftStorage,,,,2,3072,,OvercloudSwiftStorage,,,,4,6144,,OvercloudComputeEOF |
- Start the seed build
Seed Installation
bash -x tripleo/tripleo-incubator/scripts/hp_ced_host_manager.sh --create-seed --vm-plan vmplan.csv 2>&1|tee LaptopSeedVMinstall.log |

- Congratulations you’ve successfully built your first cloud (seed)- only two more to go, undercloud and overcloud!
- Wait 5 minutes to allow the seed vm services to complete their configurations.
- Now login to the seed vm and configure the environment variables.
Seed VM Configuration
# login to seed vmssh 192.0.2.1 # configure environment variablesexport OVERCLOUD_SWIFTSTORAGESCALE=1export OVERCLOUD_SWIFT_REPLICA_COUNT=1export OVERCLOUD_CONTROLSCALE=1export USE_TRICKLE=0 |
- If the gateway interface on the SEED HOST does NOT default to “eth0” then this next step WILL be required. Please ensure you verify this on the SEED HOST not the newly created SEED VM. The following picture shows a gateway that requires this step.

- Modify /root/tripleo/configs/kvm-default.json on the SEED VM and change the bridge_interface to match the interface identified in the step above e.g. “em1”.
Modify /root/tripleo/configs/kvm-default.json
{ "cloud_type": "KVM", "compute_scale": 1, "vsa_scale": 0, "vsa_ao_scale": 0, "so_swift_storage_scale": 0, "so_swift_proxy_scale": 0, "bridge_interface": "em1", "ntp": { "overcloud_server": "192.168.122.1", "undercloud_server": "192.168.122.1", "seed_server": "192.168.122.1" }} |
- Optional – If running on under resourced hardware it may be necessary to increase the default time-outs.
Constrained hardware settings
export OVERCLOUD_STACK_TIMEOUT=120export UNDERCLOUD_STACK_TIMEOUT=120 |
- Finally start the undercloud and overcloud build.
Begin the undercloud and overcloud build
# Execute this line if you had to modify the kvm-defaults.json file abovesource /root/tripleo/tripleo-incubator/scripts/hp_ced_load_config.sh /root/tripleo/configs/kvm-default.json# start the UC & OC build processbash -x tripleo/tripleo-incubator/scripts/hp_ced_installer.sh 2>&1|tee Laptopstackinstall.log |
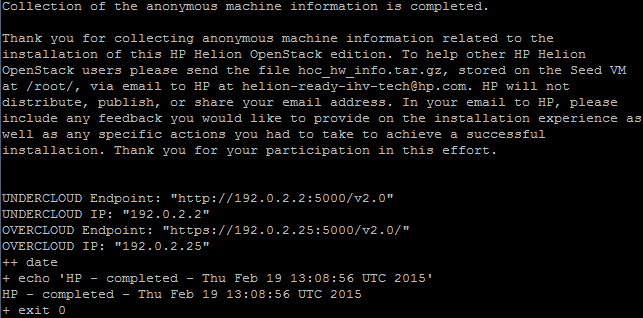
- After about 30 minutes to 3 hours depending on hardware hopefully you’ll see this…

Leave a reply to Virtual Installation of Helion OpenStack v1.1 RC2 (Build76) | All Things Cloud Cancel reply