
HP Helion OpenStack® CE 1.4 Installation Notes
Some really basic stuff here just in case anyone is not familiar with getting the binaries onto the system etc..
1. Get the latest installation documentation here -> https://docs.hpcloud.com/helion/community/
2. Download and install a supported base OS from here -> http://www.ubuntu.com/download
3. Register and download the latest Helion OS CC edition from here -> http://www8.hp.com/uk/en/cloud/hphelion-openstack-community.html
4. Use WinSCP (http://winscp.net/eng/download.php) to copy the downloaded Helion OS file to the Ubuntu Seed Server created in step 2 above [ I find WinSCP handy for transferring files between Linux and Windows systems]
Installation Prerequisites
5. Install the following packages on the seed server –
sudo apt-get install -y libvirt-bin openvswitch-switch python-libvirt qemu-system-x86

6. Restart libvirt packages
sudo /etc/init.d/libvirt-bin restart
![]()
Obtain a public key
7. Login as root
sudo su –
![]()
8. Check if .ssh/id_rsa exists
ls -al ~root/.ssh/
[Note : Different to what is in the installation documentation ]
![]()
9. Create one if it does not exist by issuing the following command leaving the passphrase blank
ssh-keygen -t rsa
[Note : Different to what is in the installation documentation ]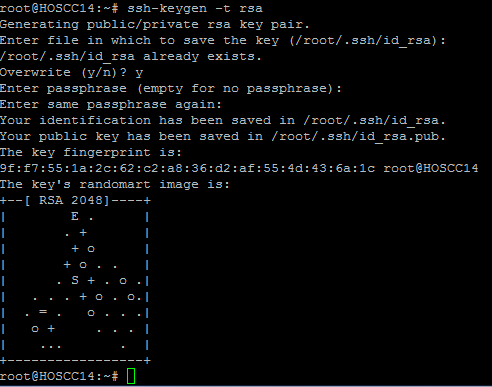
[ Note : In the example above file already existed so first time use would be slightly different]
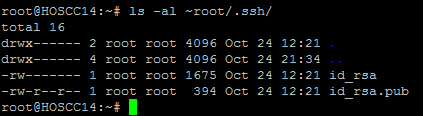
10. Again, check if .ssh/id_rsa exists
ls -al ~root/.ssh/ [Note : Different to what is in the installation documentation ]
Verify & Unpack the installation file
11. Log into the seed vm as root
$ sudo su –
12. The MD5 checksum for version 1.4 should be : e397c2795359d959376e9f3b2fe276e4
$ md5sum /tmp/Helion_Openstack_Community_V1.4.tar.gz
![]()
13. Create a work directory and extract the helion install package there
mkdir work
cd work
tar -zxvf /tmp/Helion_Openstack_Community_V1.4.tar.gz

……

Set DNS servers
14. Edit the overcloud_neutron_dhcp_agent.json file located in the installation media (tripleo/hp_passthrough/overcloud_neutron_dhcp_agent.json) to include the following line replacing 8.8.8.8 with your DNS server details.
{“option”:”dnsmasq_dns_servers”,”value”:”8.8.8.8″}

15. Copy the overcloud_neutron_dhcp_agent.json file to a new file named undercloud_neutron_dhcp_agent.json to configure the same forwarders for the undercloud.
cp tripleo/hp_passthrough/overcloud_neutron_dhcp_agent.json tripleo/hp_passthrough/undercloud_neutron_dhcp_agent.json
Start the Installation
16. Start the installation using the following command
HP_VM_MODE=y bash -x ~root/work/tripleo/tripleo-incubator/scripts/hp_ced_host_manager.sh –create seed
16. FAILURE ……
+ echo ‘Mon Nov 3 14:37:55 GMT 2014 — Watch for seed VM configure signal.’
Mon Nov 3 14:37:55 GMT 2014 — Watch for seed VM configure signal.
+ timeout 600 sh -c ‘printf “HTTP/1.0 200 OKrnrnrn” |
nc -l 192.168.122.1 27410 | grep -q seedImageID’
error: Failed to start domain seed
error: internal error: process exited while connecting to monitor: qemu: at most 2047 MB RAM can be simulated

Troubleshooting
17. Go to the troubleshooting documentation located here https://docs.hpcloud.com/helion/community/troubleshooting/
18. How embarrassing … a quick google indicates a potential 32 bit issue…in my rush to spin up an Ubuntu 14.04 server I somehow managed to download one of the 32 bit binaries..doh!!! That’s what I get for attempting to multi-task whilst installing Helion OpenStack.
Update 01/12/14: See post for work around.

Leave a comment